Factory Reset Procedure for the R400N / R400NG
Please note. Opening the R400N or R400NG unit to perform a Factory Reset will invalidate any remaining warranty on the unit. In addition, Comar Systems will accept no responsibility for any damage or malfunction occurring as a result attempting the reset procedure.
Outline
On the PCB assembly within the R400N /R400NG enclosure is a 3-pin header (adjacent to the Digi Ethernet module). Shorting 2 of the pins of this header, can be used to force a factory reset on the Digi module, forcing it to return to its default settings.
These default settings will reset the Ethernet port to its default configuration (dynamic IP address, DHCP client enabled) which should enable discovery of, and connection to, a ‘lost’ device. However, it will also reset the Serial Port parameters and User settings (including password).
You will need to use the default password to log in to the unit to change the ethernet and serial port settings to your requirements.
To perform the reset you will need to obtain a 2.54mm ‘Jumper Link’
(often used on PCs and similar equipment).

You will also need the ‘DigiDiscovery’ software
(This can be downloaded from the Comar Systems web site [software for R400N] and is used to locate the IP address of the R400N as well as to re-load the configuration for user / serial port settings for the R400N)
And the configuration file (this will be emailed to you).
Before starting the process, it is important to download, and install, the DigiDiscovery software, onto a suitable PC or laptop, which is connected to the same network that the R400N will be connected to after the reset procedure. Note: it is essential that the network as an active DHCP server to allocate an IP address to the R400N
You will also need to have the configuration file available on the same PC.
Procedure
(note these instructions apply to both the R400N and R400NG, but to not apply to the R400NX)
- Disconnect all cables from the R400N
- Open the Unit
Remove the 4 screws from the R400N end panel with the ethernet connection,
Carefully withdraw the PCB assembly form the housing to reveal the Digi Ethernet Module
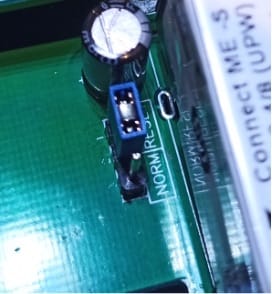
- Locate the 3-pin header next to the Digi module, and identify the two pins marked as ‘Reset’
The notation for the identification of the pins is on the PCB, between the header and the Digi module.
- Place the jumper link on these two pins
- Connect power to the R400N
The Power LED should light
- Wait for 30 seconds, then remove the jumper link (do not remove the power)
- Wait a further 30 seconds, the remove the power.
- Connect the network cable (connected to the same network as the PC with the DigiDiscovery Software.)
- Connect power to the R400N
- Wait 30 seconds
- Run the DigiDiscovery software.
The software should locate the Digi module in the R400N

- Copy the IP address given into your browser (usually this can be done by double-clicking on the displayed IP address)
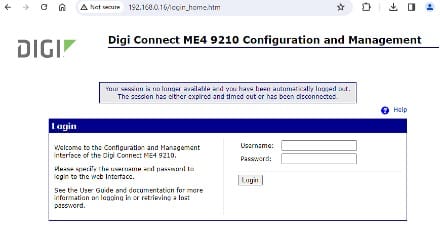
- Log in to the configuration page on your browser
The Username will be ‘root’
The password will depend on the age of the Digi Module
(if the Digi Module has ‘UPW’ in the top of the label,
The password will be written on the label on the side of the module
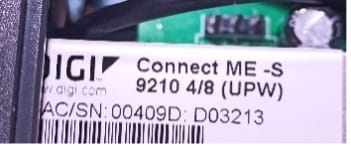
If not, the password should be ‘dbps’
- Once logged in, go to the Backup/Restore tab (under Administration)
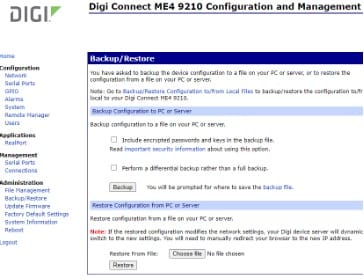
- At the bottom of the page, click ‘Choose File
- Choose the config file as sent to you (e.g. )
- Click ‘Restore’
- Then, when prompted, click ‘Reboot’
- Wait for 1 minute
- The browser should automatically open the log in page again
If not, on the DigiDiscovery software, click ‘Refresh View’ to find the device again
- Log in again with Username of ‘root’ and Password of ‘dbps’
- Go to: Configuration>Serial Ports>Basic Serial Settings

Confirm the Baud Rate is set to 38400 (if the configuration was correctly restored, it will be set to 38400)
- The reset process is now complete, please re-fit the end panel of the R400N enclosure.
The port profile settings for the ethernet connection (TCP/UDP, IP addresses, Port Numbers) can now be set in the Configuration>Serial Ports>Port Profile Settings Tab
Similar Articles